Before we dive into the floury, papery trenches of piñata craftsmanship, let’s get our facts straight. A piñata, in its most basic form, is a container often made of papier-mâché, pottery, or cloth; it’s filled to the brim with sweets, confetti, and sometimes toys. Traditionally, it’s then bashed open as part of a celebration. The concept may seem simple, but piñatas pack a punch of cultural significance. From Mexico to Morocco, these festive figures play a starring role in celebrations, carrying with them centuries of tradition and a sprinkle of societal symbolism. Whether they’re marking a religious occasion, a birthday, or any party that needs an extra dash of fun, piñatas bridge the gap between history and party favors.

Now, hold onto your party hats because we’re about to embark on an epic journey of creation. From the initial balloon pop to the final sprinkle of confetti, we’ll cover every step of the piñata-making process. Expect to get your hands dirty with paper mache, explore a kaleidoscope of decoration ideas, and discover the joy of stuffing your creation with more goodies than it can hold. Let’s get this party started!
Materials Needed to Make a Pinata
Alright, future piñata pioneers, let’s rally around the shopping list that’s going to transform you into a crafting legend. You’ll need:
- Balloons or cardboard: Depending on whether you’re going for a traditional shape (balloons) or something more avant-garde (cardboard). Balloons are great for round, robust piñatas, while cardboard lets your creativity run wild with custom shapes.
- Newspaper: Your piñata’s outer shell is only as good as the paper you papier-mâché with. Raid your recycling bin for old newspapers. It’s for a good cause, we promise!
- Flour and water: For your papier-mâché paste, use organic, gluten-free, or plain old all-purpose flour—the piñata won’t judge your choice.
- Paint or tissue paper: Here’s where the magic happens. Bold colors, pastel hues, glitter – choose materials to make your piñata pop visually and match your party’s theme.
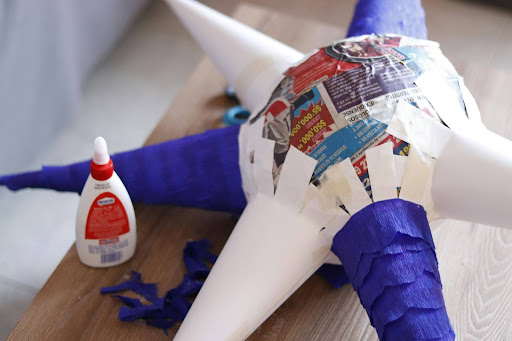
- Adhesive (glue or tape): We don’t want any party fouls when the first candy-seeking missile strikes, so go for a strong adhesive to keep everything in place.
- Candy/toys/confetti: These are the heart and soul of your piñata. Mix them up with goodies that will have both kiddos and parents scrambling when the shell cracks open.
When picking materials, think about durability (we don’t want the piñata giving up too easily) and aesthetics (because of Instagram). The golden rule? If it makes you smile, it’s a go. Let’s turn those materials into the talk of the town (or at least the party).
Step-by-Step Guide to Making a Piñata

- Creating the Frame: Kick things off by deciding if your piñata will be a balloon-based beauty or a cardboard-crafted marvel. Balloons are great for beginners – just blow it up, and you have your base! Cardboard is for the Michelangelos of the piñata world, offering endless possibilities from dragons to guitars. Choose your fighter!
- Prepare Paper Mache Process: Now, let’s get messy! Mix one part flour with two parts water to create your papier-mâché paste. Aim for a consistency that’s not too runny, kind of like that pancake batter you messed up last Sunday. Tear your newspaper into strips, dip them in the paste, and apply them to your frame. Layer up until your creation is as sturdy as your resolve to finish this project.
- Decorating Your Piñata: Once dry, it’s time to turn this newspaper-clad blob into a work of art. Grab your paint or tissue paper and go wild. Want a polka-dotted donkey? You got it. A glittery unicorn? Sure thing. This is your moment to shine, so sprinkle that creativity like confetti!
- Filling the Piñata: The fun part is stuffing it with goodies. Think outside the candy box with mini toys, stickers, or even joke notes for a giggle upon discovery. Remember, don’t overstuff; we’re not trying to create a black hole of treats.
- Preparing to Hang: Securely attaching a rope might be the most adult thing you’ll do in this process. Find a sturdy spot on your piñata, make a strong rope or cord loop, and secure it with tape or glue. You want it to hold up under pressure but not so tough that it becomes a piñata piñata – something that refuses to break, no matter how hard you hit.
Customization Ideas for a Pinata
Diving into the world of piñata customization is like opening a Pandora’s box of endless possibilities, minus the impending doom. Let’s talk about themed piñatas. Is your kid obsessed with astronauts and outer space? Launch a rocket-shaped piñata into the stratosphere of your backyard bash. Hosting a Halloween haunt? A spooky ghost or jack-o’-lantern piñata will have the ghouls and boys shrieking with delight. And for those who prefer their parties bruise-free, the pull-string piñata is a game-changer. It’s like a magic trick where everyone pulls a string, but only one lucky soul unleashes the avalanche of treasures within. This method is perfect for indoor events or when you want to avoid giving miniature bats to a swarm of over-energized kiddos. Whether you’re crafting a heart for Valentine’s Day or a tree for Christmas, remember, the only limit is your imagination and perhaps your patience for papier-mâché. So, gear up to personalize that party with a piñata that screams (or politely states), “This is my jam!”
Conclusion
And there we have it, fellow Fiesta fanatics – the grand tour through the whimsical world of piñata creation! From choosing your champion (be it balloon or cardboard) to creating the frame to diving hands-first into the gooey glory of paper mache, we’ve journeyed through every sticky, glitter-flecked step. We painted our way to Picasso-esque prowess, filled our creations with goodies that would make a treasure chest jealous, and secured them for the grand aerial display. But, dear craftspeople, the journey doesn’t end here. It’s merely the beginning of a multitude of piñata parties, each adorned with a masterpiece more magnificent than the last. So, wield your glue sticks with pride, let your imagination gallop wilder than a piñata at a candy store stampede, and remember: in the realm of piñata crafting, the only rules are the ones you festoon with streamers and smash with a stick. Now, go forth and bring those bash-worthy beauties to life!
FAQs
- What are the best materials to use for making a piñata?
Newspaper and flour-water paste are the unsung heroes of the piñata world. They’re cheap and abundant, and they make you feel like a wizard mixing potions. For decorations, unleash your inner artist with paint and tissue paper, turning your piñata into a Technicolor dream.
- How long does it take to make a piñata at home?
Imagine you’ve decided to binge-watch your favorite series from the ’90s but with more productive outcomes. Making a piñata can take a few hours to a couple of days, depending on drying times and how elaborate your design fantasies are.
- Can I make a piñata without using balloons?
Absolutely! Cardboard is your loyal sidekick here, allowing for shapes defying balloons’ round tyranny. Think starships, dinosaurs, or even a replica of your favorite coffee mug.
- What are some safe alternatives to candy for piñata fillers?
For the health-conscious or allergy-aware, small toys, stickers, and even school supplies can make for an exciting treasure trove. Just imagine the joy of discovering a cool eraser or a funky pencil!
- How can I make a piñata eco-friendly?
Repurposed materials like old clothes for stuffing or decorations to lessen your ecological footprint. Biodegradable confetti makes for an earth-friendly celebratory burst, ensuring your party’s impact is remembered in hearts, not landfills.